Tutorial for Christmas Table Runner using Appliqué ~ Made By Yours Truly!
I’ve been trying to work out the best way to make a table runner for my parents for Christmas while using up the material I had plus some new backing material I’d bought. I don’t think my sewing skills are quite up to patchwork and making a quilt, although that is one of my projects for 2012. I scouted around and asked fellow MNers and one of them suggested this pattern which I used for inspiration. As I’d recently done my first bit of appliqué with my sister’s tea-cosies, I thought I’d give it a go.

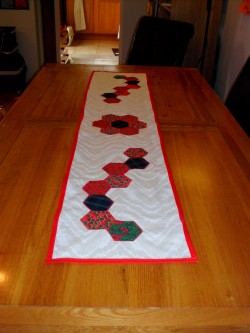
- Christmas Table Runner ~ with appliquéd hexagons

Yet again, this was so simple to make but I think it looks beautiful.
Materials Needed
Backing material (I used a fairly heavyweight cream-coloured fabric 142.5cm x 30cm. If you’re making more than one, you can get three out of a normal meter of material)
Patches of patterned or coloured material for hexagons (I used seven darker ones, and a combination of different reds for the remaining 16 hexagons). If you’re following my pattern exactly, you’ll need six red outer hexagons and one darker inner. For the ‘wiggles’, you’ll need ten reds and six darker hexagons. Of course, you can always create your own pattern and design depending on the fabrics you have to hand and what you think looks nice.
Fusible iron-on interfacing for the appliqué of the hexagons.
fabric scissors
matching thread
binding (350cm length – I used one with 1cm width when folded (so 4cm unfolded)
iron
card for template
pencil
- Create a template for your hexagon.
 You can simply hold a piece of paper up to this hexagon here and trace it. Stick it onto some card, cut it out and hey presto, you have a hexagon template!
 - Measure and cut out your squares of material (slightly larger than the size of the hexagon)
- Measure and cut out your squares of interfacing (the same number as the fabric for hexagons – which is 23 if you’re following my pattern. I used some bondaweb which was 50cm x 50cm and have plenty left over)
- Using the template,draw a hexagon onto each of your 23 fusible interfacing squares.
- Iron the interfacing onto the wrong side of your small fabric squares, using a dry iron (steam could prevent the glue from working properly).
- Cut out the 23 hexagon shapes and carefully peeel the backing paper away, making sure you leave the gluey webbing on the fabric (not on the paper!)
- Lay your backing fabric out flat (ideally on an ironing board) and create your design. I started with the centre of the flower, measuring to find the centre of the runner, and worked my way from there.
- Once happy with your layout, carefully iron the hexagons into place, making sure they don’t slip as you go.
- Time for the appliqué bit of stitching. When all hexagons are stuck on, begin your zig-zag stitching to secure and add to the ‘look’. I started with the wiggly bits. Each time I came to a join, I used a loose running stitch first to get to the other side, then turned it 180° and zig-zag stitched back again. You could stop and start each time, but this way is much quicker, easier and barely shows if your stitch is straight.
- For the flower, start with the centre and stitch all around. For the remaining ‘petals’ follow the same principle as before of doing a loose running stitch in to the centre before turning it 180° and zig-zag stitching back to the outer edge.
- When all hexagons are stitched into place, use a simple running stitch to secure the binding onto the four edges. I did this by cutting the four lengths of binding and creating a plain square corner, but you could do something fancier if you prefer.
- You’re done! Made By Yours Truly. Now sit back and, as ever, enjoy a nice cuppa or a large glass of wine while admiring your handiwork.


Trackbacks