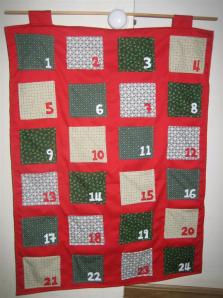
Fabric Advent Calendar with Pockets ~ How to make a fabric advent pocket calendar ~ with free tutorial
Last autumn I made my family our own advent calendar with pockets. We wrote out 24 activities we wanted to do together during the lead up to Christmas and it was just lovely. A friend commissioned me to make one for her too this year, and it’s been on my To Do list since last Christmas! Now I know this is a bit premature for Christmas 2012 but I knew it would take me a while and my To Do list is growing by the week so I thought I’d better knuckle down and get on with it. I finally got round to sourcing the fabrics during the summer holidays, and over the past couple of weeks I’ve been furiously creating, stitching and gluing, and have come up with this…
While I was at it, I thought I’d make another which is available for you to buy from my website, www.MadeByYoursTruly.co.uk, if you don’t have the time or inclination to make one for yourself.
If you are so inclined however, here is a free tutorial on how to make your own wallhanging advent calendar with pockets, with step-by-step instructions and photos below to help you along…
Materials Needed
- Main backing fabric [I used a heavy red cotton] 70cm x 90cm
- Fabric for 2x tabs [I used the same as the backing fabric] each 20cm x 10cm
- Fabric for pockets [I bought a bundle of Fat Quarters of four different fabrics] (for my own calendar I used up scraps of favourite materials and had six different fabrics). Each pocket measures 11cm x 11cm when complete but is made of doubled fabric (for strength) so for each pocket you will need a 12cm x 24cm strip. One Fat Quarter will easily give you six pockets.
- Felt for the numbers
- Fabric glue
- Fabric scissors
- Threads
- Iron
- Dowel [I used 12mm x 70 cm]
- Useful: rotary cutter & ‘magic mat’ (self-healing mat).
How To Make Your Own Wall-hanging Fabric Advent Calendar with Pockets
- Cut out your backing fabric. Fold over and press each edge 1cm twice to form a hem. Cutting the corners to reduce bulk, and using a 7.5mm seam, stitch the hem down.
- To create the tabs, fold the length of the fabric in on itself. With the folds (and therefore raw edges) on the outside, stitch the short edges together to form a loop. Flip the tab the right way round and pin in place along the top back of the backing fabric. Stitch in place.
- Cut out your pieces for the pockets. If you’re using fabrics with a pattern, ensure that you cut the pieces so that the pattern will be the right way round when made.
- To create the pockets fold each strip in half, Right Sides together, and sew along two full lengths of raw edges and half of the third raw edge (leaving a gap for turning). Backstitch at the start and finish to secure.
- Trim the corners to reduce bulk.
- Turn each pocket the right way round and press, making sure you press the gap closed to be in line with the hem.
- Place and pin the pockets on the backing fabric, making sure that the unstitched open gap isn’t on the top.
- Using a coordinating thread with the backing fabric in the lower bobbin, and a thread of your choice (to either match or stand out against your pocket fabrics), stitch the three sides of each pocket onto the backing fabric, backstitching at the start and finish to secure.
- Cut out the numbers in felt. I do this by hand but you could use a template if you’d prefer.
- For Nos 1- 24, you will need;
- Thirteen 1s
- Eight 2s
- Three lots of 3s & 4s
- Two each of 6s, 7s, 8s, 9s and 0s
- For Nos 1- 24, you will need;
- Follow the instructions on your fabric glue, and glue numbers in place.
- Insert the dowel into the tabs. Ta Daaah! You’re Done ~ Made By Yours Truly ! Now sit back and start planning what lovely things you’ll do when it comes to advent.


Any chance you would care to share you list of activities with us?
Of course! Bear in mind though that my kids were only 1, 2 and 4 last year, so they were quite basic activities but I’ll dig them out…
Here you go…