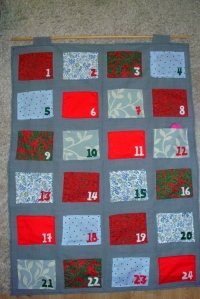
Our Christmas countdown – wallhanging pocket advent calendar with activities

As I mentioned on another post, my Little People and I have been very busy since the start of December with our Christmas activities. A few weeks back I created a large wallhanging advent calendar earlier on in the autumn, with 24 pockets. I wanted to have a few Christmassy activities to do together as a family during advent.
We sat down as a family to come up with the ideas, and I had thought that we would struggle to come up with 24 but when it came to it, we actually had to pare our ideas down to fit them in. Don’t get me wrong, the activities we came up with didn’t mean we’re all singing, all dancing every day!
This is a list of the 24 activities we decided to do as a family together although they’re not quite in the order we’re doing them;
- Watch a Christmas film together
- Build a tent and have an indoor Christmas picnic
- Make Christmas cards
- Decorate the Christmas tree
- Make peppermint Christmas tree decorations
- Decorate the Little People’s rooms
- Go for a walk in the dark with torches
- Make Christmas spiced biscuits with cinnamon
- Make some glittery Christmas playdough
- Learn and sing some Christmas songs and carols
- Make paper chains
- Read the Christmas story together
- Decorate the whole house and put up the Christmas wreath
- Make Christmas cupcakes
- Make a Christmas picture
- Make Christmas tree decorations
- Donate toys and books to charity
- Wrap up warm, go for a long cold walk in the park and see some Christmas lights
- Wrap Christmas presents
- Eat Christmas biscuits and drink hot chocolate around the Christmas tree
- Go to see the ‘singing bears’ and Christmas lights
- Go to visit Father Christmas with Granny and Grandpa
- Go and choose our Christmas tree
- Put stockings up and go to Christmas Eve mass
Making the wallhanging was very simple if a little time-consuming. I wanted a combination of reds and blues and to use up some spare material I had lying around, so used three different reds and three different blues that complement each other. Use whatever colours and colour combination takes your fancy – I imagine four different colours would work well so that you have a different layout for each row.
Here’s how I made ours;
Tutorial for a wallhanging fabric advent calendar
Materials Needed
- Start by measuring and cutting all the material down to size but iron on any interfacing first as it’s less fiddly than doing it separately afterwards.
- For each pocket, fold in a 1cm seam all round (using the card template to help), pin and press to help keep the shape. For less bulk at the corners, you could fold the seams to create lines at each corner, then unfold and fold a small triangle in using the folded lines as a guide. Unfold again, sew across the guide diagonal line, trim the excess, then fold the corners in again and pin. I didn’t bother as it’s a very fiddly and time-consuming job and I was lazy!
- Stitch fully around each pocket so you now have 24 squares of 12.5cm x 10cm.
- Fold in and pin a 1cm seam around your backing material.
- Make the tab loops by folding in your 1cm seams and stitching closed. Fold in half and pin to the top back of the backing fabric to create a loop. Make sure they are an equal distance from each edge. I did mine about 6cm in.
- Do a running stitch around the backing fabric, backstitching over the loops a couple of times to ensure they’re nice and secure.
- Lay the backing flat and measure out the positioning of each pocket. My pockets were 3cm from the top, 2.5cm from the bottom, 1.5cm from the sides with a 3cm wide gap between pockets and about 5cm depth gap between pockets.
- Play around with the pocket placements until you’re happy with the look. I did two blues and two reds on each row, alternating with starting colours. Pin in place and stitch around the three sides of each pocket, remembering to backstitch at the start and end of each pocket to secure the thread. I did column by column so that I could then fold the material in to be able to sew all the way across the width of the backing material.
- Using your felt, cut the numbers out. I did this freehand, but you could print numbers out and use them as templates if you don’t feel confident to do it freehand. I used red, white and green felt to make it more Christmassy and to stand out against the pockets.
- Using fabric glue, stick the numbers onto the pockets and allow to dry thoroughly.
- Thread the dowl through the loops and you’re nearly done.
- Write out your 24 activities and put them in the pockets. I also threw in a chocolate coin every now and then for good measure. Made By Yours Truly!Now sit back and admire your work, with a nice cup of tea or a large glass of wine!


Trackbacks